The vent above your door is the gateway to hearing everything else going on outside of your room. This article explains how to soundproof an above-door air vent.
Here are 2 resolutions on how to sound proof an air vent:
- Install or create a sound maze
- Completely cover your air vent
If you don’t do anything about this open grate then your efforts to soundproof your room will be ineffective. You need to block the vent in order to achieve peace and quiet.
Sound Maze
Creating a sound maze for your vent allows you to keep your room efficiently heated and cooled while also reducing noise immensely. Check out the drawing of what a sound maze looks like.
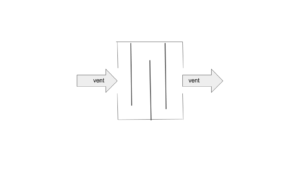
The arrows represent the airflow into and out of the vents. The thicker lines in the drawing represent the maze, which consists of thin, foam-covered pieces of wood glued and tape inside the wall of the air vent.
It is basically a system of sound barriers set up a certain way in your air vent spacing to reduce noise. The parts used to create this tiny maze consist of thin wood pieces and foam tape. The wood scraps are installed in a specific over-laying pattern that forces sound to work around each piece in a zig-zagging fashion before reaching your room. This design greatly reduces the amount of sound that enters your room.
How To Make a Sound Maze
It is actually quite simple to create a sound maze once you understand what you are doing and know which products to use. Below I have created a quick checklist of supplies to get for building a sound maze in your air vent:
- Acoustic foam. You can use this silence foam.
- 1/2” plywood
- Saw
- Glue or Tape
- Small screws
- Screwdriver or Drill. You might want to consider this power drill to make installation easier.
Here are three simple steps to design your first sound maze for an air vent. Please be careful using a saw or any heavy duty power tool. Always wear eye protection and gloves.
- Start by sawing your plywood pieces accordingly to fit inside of your air vent. You should make measurements beforehand so each piece fits inside your vent and is long enough to create that zig-zagging pattern to deaden any noise.
- Next, cut the acoustic foam to match the size of the wood pieces then glue foam to the wood on both sides and let dry.
- Lastly, install your soundproof plywood pieces by drilling the small screws to the side walls inside your air vent.
The drawback of using a sound maze is that it does not block sound 100% like the air vent occlusion method you will learn about next. However, you will notice a significant decrease in noise. Sounds will appear muffled and less distinct compared to leaving your vent unobstructed.
Air Vent Occlusion
This method involves blocking your air vent entirely. You need to do something that will obstruct the vent opening to block sound from entering the room.
One approach you can take is to remove the vent and install drywall to cover the hole. If you are not good with your hands then this could prove to be challenging and costly.
A much easier solution is to use this foam sealant by GREAT STUFF that does an amazing job of filling gaps and insulating. It’s simple to apply and safe to use indoors. Just keep spraying until you fill the entire hole. It will dry and harden forming an airtight seal. I also mention using this sealant in my post on how to soundproof your bathroom because it does a great job of sealing your room airtight!
After applying this gap filler, you can then place the air vent grates back in their original spot. This way, the vent covers the foam and everything looks normal again above your door. One slight caveat with this method is the reduction of room ventilation. During the summer months, your room may become extremely hot. Conversely, during winter months your room can become very cold if your insulation is not thick enough. Air vents enable rooms to be efficiently heated and cooled. By closing off your only source of ventilation will have an impact on the room environment and temperature. If you plan on spending a lot of time in your soundproof room, it may be uncomfortable depending on the season and outside conditions.
Test out either option and let us know how it worked out for you. This is a great way to make your room quieter. If you have any other ideas for us and our readers leave a comment below!