For any true gym warrior looking to make gains and break personal records, a home gym is super convenient. Whether you are working out in your garage, basement, or a designated room of your house, a weightlifting platform is ideal for protecting your floors and reducing noise.
Here are the steps on how to build a soundproof weightlifting platform:
- Coat the middle top platform board with polyurethane
- Cut stall mats to the correct size
- Drill stall mats to plywood
- Drill the center platform boards together
- Fit the boards together so they’re flush
Of course this won’t make your exercises 100% soundproof but it will certainly help to mitigate the noise. This article will teach you how to build a weightlifting platform that is portable, soundproof, lightweight, easy to break down and store.
How To Build A Portable Quiet Deadlift Platform
Here is an extremely helpful video you can watch for building your own weightlifting platform. If you do not want to watch the video you can skip to the written instructions further down the post.
The rest of this article outlines the materials, tools, and design for a quiet, low vibration Olympic weightlifting training platform. Please be sure to take all safety precautions. Remember to take your time to prevent any extra costs.
Materials For Building A Silent Deadlift Platform
You can get these materials from anywhere. I suggest finding either a Home Depot or Lowe’s store near you. You can also check Amazon if you would rather have it delivered to your doorstep.
- Plywood (¾” thick) cut into 3 separate pieces accordingly:
- 2 Side Boards – cut into 4’ x 2’ rectangles.
- 2 Middle Platform Boards – cut into into 4’ x 4’ squares. For the top platform board you can purchase a premium wood like maple or oak for a nicer finish. Just to reiterate, make sure these boards are ¾” thick so they match the stall mats.
- A couple of Stall Mats (¾” thick) – These typically measure 4’ x 6’ in size. It is important that the mat thickness matches the platform board thickness. It’s ok if you have leftover mats. You will find a way to use them. Trust me.
- Construction Screws or Wood Screws (1.25” long)
- Polyurethane to stain the top layer platform. This enhances traction, protects the wood surface, increases lifespan, and improves overall appearance.
*If you are getting your materials from Home Depot or Lowes, make sure to have them cut the pieces there so you can fit them into your SUV or truck. If you do not have a large utility vehicle to transport these large wood boards, you can either rent a Uhaul truck or rent a truck from Home Depot for cheap.
Tools For Building A Movable Lifting Platform
Here are a few tools that will make this project much easier to complete.
- Power drill
- Heavy duty Box cutter with plenty of blades or use a Jigsaw
- Chalk line
Now onto the actual instructions of how to put this together…
DIY Steps – Portable Deadlift Platform
Here are the step-by-step instructions to easily build your own soundproof weightlifting platform. These are very simple and should take no more than a couple of hours to put together if you take your time.
Step 1 – Coat Top Platform With Polyurethane
Designate one of the middle 4’x4’ pieces of plywood as your top layer platform and coat with polyurethane. Since this takes a while to dry, I have placed this step first. Allow the first coat to dry before applying the second coat of polyurethane.
Step 2 – Cut Stall Mats To Size
Take one of the 4’x2’ pieces of plywood and place it on a stall mat. Make sure it is pressed flush up against one edge of the mat. Now, sit on the plywood and use the edge to assist you in cutting the stall mat to size with your box cutter. The plywood should act as your cutting guide much like a straight edge. You could also use a chalking as your guide instead if you prefer. Repeat mat cuttings for the other 4’x2’ piece of plywood.
Step 3 – Drill Mats To Plywood
Use your power drill to screw the stall mats to the 4’ x 2’ pieces of plywood with 1.25” wood screws. First, drill the screws into the 4 corners of each mat leaving about 1” from the edges. Continue drilling screws down the length of the mat every 5.75 inches. There should be a total of 9 screws spanning the length of the plywood. Drill screws every 5.5 inches across the width of the plywood. You should end up with a total of 5 screws spanning the width. Check out the diagram below as a reference (apologies for the clarity).
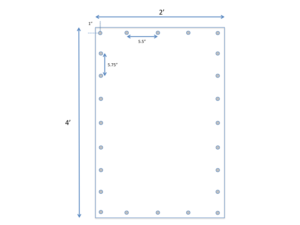
If you end up having fewer or more screws on each board, don’t worry. You just want to make sure each mat is securely fastened to each piece of plywood.
Step 4 – Drill The Two Platform Pieces Together
Place the 4’ x 4’ polyurethane coated platform on top of the other piece of 4’ x 4’ plywood. Drill both pieces together using the 1.25” wood screws spaced evenly around the board leaving about ½” from the edge. This is similar to how you screwed the stall mats to the plywood in the previous step.
Step 5 – Put It All Together
Now, rest the middle platform on an even, stable surface with good traction. Slide the side pieces with the matting firmly up against the sides of the platform so they don’t move. You are ready to lift!
The Finished Product
Make sure to test out your new platform for any defects. Go ahead and try a few deadlifts to make sure it performs as expected. My hope is you found these instructions and tips helpful in building your own portable weightlifting platform. It is easy to break down and transport, which is why I like it so much. Plus it is durable and should last you many gym sessions. Here’s to reaching your new PRs!
Cost of Building A Portable Deadlift Platform
Building a portable weightlifting platform is relatively cheap. It should cost between $100 – $200 at the most. This design will make it very easy for you to move it around. The average deadlift platform is 4’ x 8’ and fairly thick, which makes it heavier than the one I’m going to show you how to build.
Is It Easy To Build A Deadlift Platform?
It is very easy to build your own weightlifting platform. The one I’m teaching you how to build is only two layers thick and easy to disassemble. It consists of 3 separate pieces, which makes it much lighter, easier to move, and easier to store.
Enough Overhead Clearance?
Please keep in mind that it is imperative to have enough overhead clearance for lifting a barbell above your noggin since a weightlifting platform will elevate you a few inches above the ground. Otherwise, your plates will go right through the ceiling leaving you a few holes to fix. I’m sure you don’t want that!
Weightlifting Platform Benefits
Before you begin building your own deadlift platform, it is good to know why this is such a staple piece of equipment in every gym. I have listed a few benefits you will experience once you start using yours.
Floor Protection
If you have a home gym, I’m sure you want to protect the integrity of your floors. Lifting and dropping weights repeatedly on your floor surface is not a good way to maintain them. Building a deadlift platform is one of the best ways to protect your floors from becoming damaged. This will save you a ton of money and headache in the long run. The thick layers of wood and rubber will prevent your floors from cracking or chipping.
Noise Reduction
This simple platform will save your family, roommates, and neighbors from hearing the loud clanking of plates against your floor. Honestly, the noise can become a nuisance if you lift late at night or early in the morning. It may cause someone to actually complain if you don’t try to keep your home gym quiet. A weightlifting platform can be the perfect solution for soundproofing your garage gym. The thick, rubber mats absorb shock and noise far better than concrete or hardwood thus making your heavy lifts quieter.
Equipment Protection
The rubber matting also keeps your equipment healthy and protected. You will notice less wear and tear on your plates by dropping them on thick rubber mats instead of a hard surface. You probably don’t realize how much stress heavy weightlifting places on your gym equipment. Using a platform can increase the overall lifespan of your barbell, plates, kettlebells, and any other gym equipment you use.
Improved Comfort
Have you ever tried performing heavy deadlifts on a hard surface like cement? It can be painful. Simply dropping the weight to the floor can send a stressful shock throughout your body. Using rubber mats to catch the weight reduces the amount of physical stress. The platform provides more cushion and stability.
Aesthetic Upgrade
If you want to improve the appearance of your home gym simply build a weightlifting platform. It not only looks good but any guests or visitors will take you more seriously as a lifter. You can even add a design to your platform. Customizing will make it look super cool. You can put a quote on the platform to help give you the mental motivation you need to reach your goals.
Increased Safety
A lifting platform provides a stable, even surface to perform your heavy exercises. It’s annoying when you have to readjust because of a bulge in carpeting or if your floor is uneven. Any slight imbalance in the floor can impact your overall lifting technique. Using a deadlift platform will provide stable footing so you can perform lifts properly without hurting yourself.